by XDK
20. June 2013 13:14
Solution:
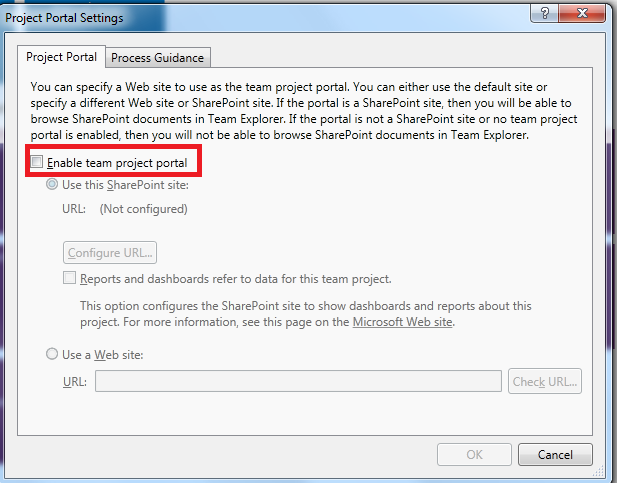
1. Remove the existing portal setting for team project as shown in the screenshort
2. Execute the following command to create a team project site
TFPT.EXE addprojectportal /collection:http://<server>:<port>/tfs/<TeamProjectCollection>
* /teamproject:<TeamProject> /processtemplate:"Microsoft Visual Studio Scrum 2.2"
by XDK
20. June 2013 05:19
Explanation:
I had this problem when I migrated TFS 2010 collection to TFS 2012 instance and having the collection online on both TFS 2010 and TFS 2012 instances in parallel.
Solution:
To fix the problem, you need to disable the team project portal links either on TFS 2010 or TFS 2012 collection --> Team projects and run the SharePoint repair on the APP TIER using TFS administration console.
Following are the steps I followed to fix the error in TFS 2012 instance
1. Open Team Explorer in Visual Studio --> Connect to TFS 2010 instance --> Select the team project that needs the fix --> goto "Portal Settings" --> Unchecked the "Enable Team Project Portal checkbox" --> click OK
2. Login to TFS 2012 App Tier --> Open TFS Administration console --> Select "Share Point Web Applications" --> Select the SharePoint URL --> click "Repair Connection" --> Repair option
All the permissions and connections to the team projects Share point sites should succeed.
(Optional)
3. Login to TFS 2010 App Tier --> Open TFS Administration console --> Select "Share Point Web Applications" --> Select the SharePoint URL --> click "Repair Connection" --> Repair option
All the permissions and connections to the team projects Share point sites should succeed.
by XDK
18. June 2013 20:33
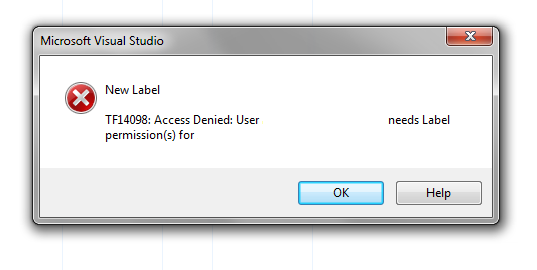
Explanation
The users should have project level permission to label any folders and files in version control using visual studio IDE. The error occurs when team project does not have project users/groups permissions set at project level but its set on folders.
Solution
Add the users/groups permission at project level.
by XDK
1. June 2013 13:24
Solution
To change run settings
1.Open a load test.
2.Expand the Run Settings folder.
3.Choose a Run Settings node.
4.On the View menu, choose Properties Window.The Properties Window is displayed and the properties for the selected run setting are displayed.
5.Use the Properties Window to change the run settings. For example, change the run duration to 00:05:00 to run your test for five minutes.
6.When you are finished changing properties, save your load test. On the File menu, choose Save.
Reference: http://msdn.microsoft.com/en-us/library/ff406976.aspx
by XDK
31. May 2013 13:10
Exception
Results from agent 'Test Agent' were not received in time to be included in the overall results for a sampling interval. To avoid this error, increase the sample rate, or decrease the load on this agent
Explanation
Sample Rate property for the load test run setting based on the length of your load test.
Solution
To specify performance counter sampling rate in a run setting
1.Open a load test.The Load Test Editor appears. The load test tree is displayed.
2.In the load test tree, in the Run Settings folder, choose the run setting that you want to specify the sample rate for.
3.On the View menu, select Properties Window.The load run setting's categories and properties are displayed in the Properties window.
4.In the Sample Rate property, enter a time value that indicates the frequency at which the load test will collect performance counter data.
5.After you have finished changing the property, choose Save on the File menu. You can then run your load test using the new Sample Rate value.
Load Test Duration - Recommended Sample Rate
< 1 Hour - 5 seconds
1 - 8 Hours - 15 seconds
8 - 24 Hours - 30 seconds
> 24 Hours - 60 seconds
Reference - http://msdn.microsoft.com/en-us/library/ff423846.aspx
 Subscribe